


 Contact

Instagram is one of the social networks with the highest number active users, so publishing your online store catalogue on it may become a great selling opportunity. If you want to sell on Instagram with your Magento store, we give you step by step instructions on how to do this below.
Requirements for connecting Magento to Instagram
You will need to have:
- A Magento account
- A Facebook account and page
- An Instagram business account
- A Business Manager account
- Created a Facebook Pixel
Facebook business extension for Magento businesses
As you may already know, the Instagram social network belongs to Facebook, so with the same Facebook extension you will also be able to publish on Instagram from your Magento online store.
The first thing to do is to install the Facebook business extension. You can do this by downloading the file from here, or through the Magento Marketplace here.
To install the Facebook business extension in your Magento online store, you should follow the steps below:
- Log into your server instance.
- Run the command cd /var/www/Magento/app/code or cd /var/www/html/Magento/app/code depending on whether you have a Centos or Ubuntu server. The path may be different depending on what you have chosen during the installation. If you can’t find it, search /var/www/html/magento2/app/code or /var/www/magento2/app/code.
- Make sure that you have the appropriate read and write permissions in the Magento root directory.
- Expand the facebook-for-magento2.zip file.
- Compress the Facebook sub-file, move it and decompress it in the code directory.
- Run the command cd ../../ to go to the Magento root folder.
- Run the following commands to install the Facebook business extension:
- Install the Facebook business SDK for PHP: composer require facebook/php-business-sdk. The extension uses this dependency.
- You will see a message like the following: “Installing facebook/php-business-sdk (8.0.0): downloading (100 %)”.
- Run php bin/magento module:status.
- The Facebook_BusinessExtension should appear on the list of deactivated modules.
- To activate the module, run php bin/magento module:enable Facebook_BusinessExtension.
- Run php bin/magento setup:upgrade.
- Run php bin/magento setup:static-content:deploy.
- Run php bin/magento setup:di:compile.
- Run php bin/magento cache:clean.
- Run php bin/magento cron:run three times.
- Optional, if you are not the owner of the Magento files.
- chmod -R 755 ./
- chmod -R 777 var/
- chmod -R 777 pub/
- chmod -R 777 app/etc
- chmod -R 777 generated
- When the installation has been completed correctly, log into the Magento administrator’s panel.
- Select the stores icon in the main menu. There should be a section called “Facebook” –> “Setup”.

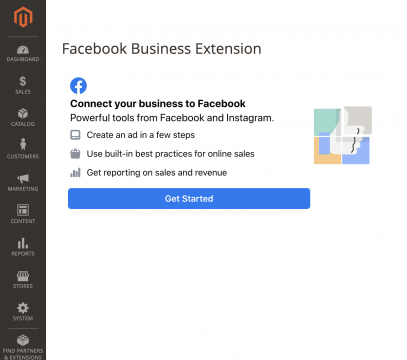
- Select Setup to access the extensions installation page.
- Select Get Started to configure the Facebook business extension.
Follow the steps and connect the Facebook Business Extension to your Facebook account.

Then, select the options for which you want to use this Facebook extension. We recommend that you select all three options.
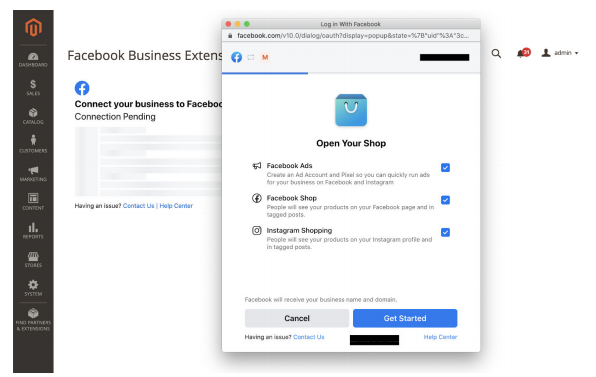
Continue and select your Business Manager (in which you have the Facebook page and the Instagram account where you want to publish your products).

Continue and select your Business Manager (in which you have the Facebook page and the Instagram account where you want to publish your products).

Now is the time to choose the catalogue in which you want to publish your products. If you don’t have one, you can create one in this step.

Once the catalogue is selected, continue to complete the configuration of your Business Account. You may need to confirm your store domain.

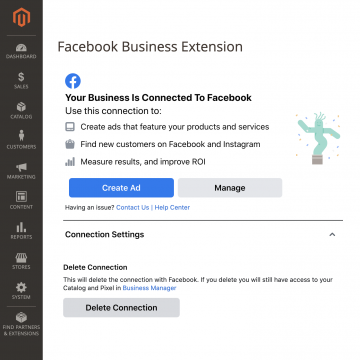
You have now configured the Facebook Business Extension for Magento. Once the configuration has been completed, if everything has been done correctly, the following pop-up will appear.

Your products catalogue will upload automatically when the configuration has been completed. Whenever a product is edited or deleted, the changes will be synchronised on Facebook and Instagram in real time. Click on Manage if you want to manage the Facebook channel.
If you wish, you can also send the complete catalogue in Stores -> Configuration -> Facebook -> Business extension -> Catalogue management -> Push products

You can find the complete Facebook Business Extension configuration guide for Magento in the following link.
If the products don’t appear on Instagram, you can add your products catalogue from the Shopping section in the Instagram business profile.
- With Instagram activated, open the business profile options and go to the Configuration section.
- Click on Business > Shopping and then confirm your Facebook account.
- Select the product catalogue that you want to connect.
- Click on the Done button.
Additionally, to synchronise your Magento online store with the Multi-Channel Integration Platform, you can follow the steps in this article.