Contact

Share This Article
First Steps
In this first video you will learn how to take your first steps with the help of our BigBuy specialists.
Inicial settings, legal information, synchronization, languages, prices, design… learn all of these and more in this video.
Political and legal information
In this lesson you will learn how to fill the legal information of your 360 store.
Your legal information will be empty, so you will need to fill it with the help of this video.
Products and collections
In this lesson you will learn how to synchronize products and orders automatically with the help of our Multi-Channel Integration Platform (MIP).
Welcome to the Multi-Channel Integration Platform, which we use to call MIP.
Customize products
You will learn how to modify and customize the products from your store by:
– modifying categories
– changing texts and images
– hiding products that are out of stock
Customize the products from your store as you want with this lesson.
Appendix
How to create tags in Shopify
Tags are very useful for grouping, organising, or filtering products within the store.
In this Appendix, we are going to see how to create the tags correctly so that the Multi-Channel (MIP) does not overwrite them during updates.
1. What tags are for in Shopify
Although customers will not be able to see the tags, they are very useful, since the search function of the Shopify online store uses them to classify the products and also to organise the search results.
You can use these tags to group products and perform collective actions on them. For example, you can add the Summer tag to all products related to this topic, even though they are not part of the same category in our catalogue.
Important: BigBuy also uses these tags for the proper functioning of the store filters, so it is very important to observe the tags created by BigBuy and not delete them.
2. How to create tags
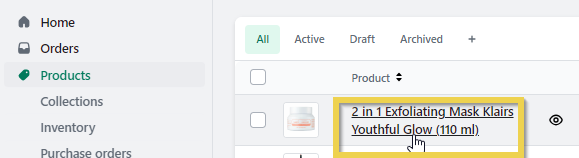
If you want to create tags for products in Shopify, go to Products and select one to open its details.
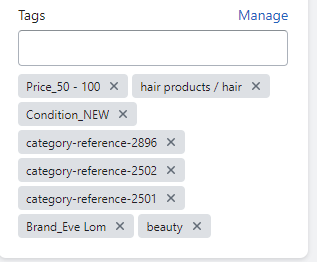
In the Tags section, enter the name of the tag you want. Note that, for synchronisation with Bigbuy to work properly and for the system to respect the tags in the updates without deleting them, they must be created in the following format: :Mother’s Day.
Important: You must include a colon before the name of the tag. If you do not create them in this format, it is very likely that our system will not observe them and will delete them in the updates.
3. How to view products by tag
To see all the products associated with a tag that we have created we must do it in a url with the following format:
If instead of having created a tag within a collection, we have created it generically for the entire store – that is, if we have given tags to products from different collections . To see all the associated products, we must do it with a URL in the following format:
Examples:
If you need more information about other Shopify features that help get the most out of tags, we invite you to read the article Create and use tags in Shopify.
Languages
This is an optional step that you can skip if you are not interested in having a multilingual store.
If you are just launching your business, we recommend configuring only one language in your store.
In this video we will show you how to modify and add a new language.
Product prices (part 1)
You will learn how to manage product prices, create pricing strategies and rules.
Product prices (part 2)
In this lesson we will show you 3 other essential configurations related to product prices.
Strikethrough prices, currencies and payment methods.
Shipping
You will learn how to synchronize and automate shipping costs with the help of the MIP.
We present you the BigBuy Dropshipping Carriers App.
If it is not activated and you meet the requirements, you should contact Shopify and ask them to enable this option in your online store as outlined in their documentation.
Appendix: Free Shipping
In this appendix we will explain one of the most effective sales strategies for online stores: free shipping.
The free shipping strategy makes customers more willing to buy a product.
Manage orders
The majority of orders will be managed automatically.
Why are the orders in my Shopify store not transferring to the Multi-Channel Integration Platform?
If you have noticed that the orders you are getting in your Shopify store are not transferring to the Multi-Channel Integration Platform it may be due to one of the following characteristics of the order:
The order has been archived
The order has been fulfilled
The payment has been authorised but has not been received
Next, we will explain in detail all the reasons that may be causing your orders not to be processed correctly.
1. Archived order
To find out if an order has been archived, when you go into an order from the Shopify panel, a tag appears at the top which states it is “Archived”.
Deactivate the archive orders option
To deactivate this option, from your control panel in Shopify, click on Settings > Payment.
Go to the Processing orders section.
Then, in the After payment has been made for an order section, deactivate the Automatically archive the order option and click on Save.
When this option is deactivated, if you want to archive orders once they have been delivered, you must do so manually.
How to unarchive and archived order
To remove an order from Archived status, click on Orders from the menu on the left and go to the order that you want to unarchive.
Click on the order you want to unarchive and then click on More actions > Unarchive, as shown in the picture. Once the order is saved in this status, the order will automatically be transferred to the Multi-Channel Integration Platform.
2. Fulfilled order
To find out if an order is has a Fulfilled status, a tag will appear in the order that will say Fulfilled.
Our system never uses this status, it always leaves it as open until it is completed.

How do you remove the Fulfilled status from an order?
Go to the orders, click on the box to the left of the order that you want to change (1). Click on the three dots on the right (2) and select Mark as unfulfilled (3)
After a short while, usually around 30 minutes, the order will pass to the Multi-Channel Integration Platform.
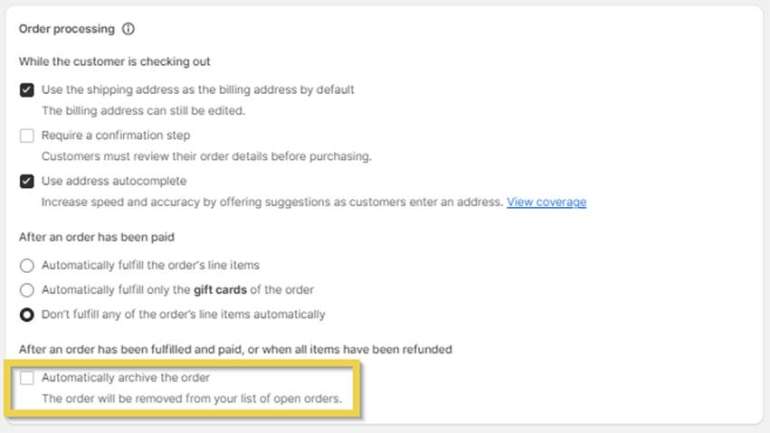
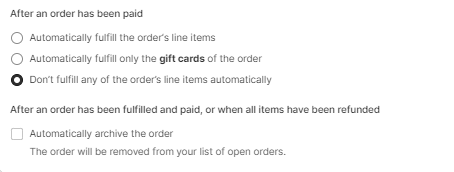
How do you deactivate the automatic fulfilment of orders?
Within the Settings > Checkout menu, keep the options as they are displayed in the image so that the orders are not fulfilled or archived automatically.
Firstly, select the option “Don’t fulfill any of the order’s line items automatically”. And secondly, the option “Automatically archive the order” should be left unselected.
3. Authorised payment

By default, payments made by credit card and those made using additional forms of payment are captured automatically. However, if the store is configured to capture manual payments, or if you wish to capture payments in advance for established orders in order fulfilment, you need to carry out an additional task to ensure the payment is received.
Orders in a Shopify store should have the Paid status that appears with a grey background as in the picture below.
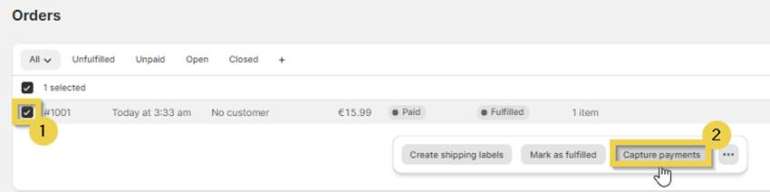
When an order has an Authorised payment, but this is not captured, you need to select the order (1) and click on the Capture payment button so that the Multi-Channel Integration Platform can process it.
If you want to automatically authorise and capture the payments of all the orders so that you don’t have to capture them manually,
If you want to know whether your store is configured to automatically or manually capture payments, see the Shopify guide Capturing Payments. For more information about the options and configuration of payment capture, see the guide Authorising and Capturing Payments.
How to refund an order on a Shopify online store

If you are selling on Shopify, at some point and for whatever reason, you will need to make a refund to a customer. Below, in this article, we show you how to do this.
To mark an order as refunded, follow the steps below.
1. In the Shopify backoffice, go to the order that you want to refund and click on Refund
2. To proceed with the refund, follow these steps:
Select the units to be refunded
Unmark the checkbox for the option Replace item
This is very important, because if you leave it checked it may lead to conflicts of available stock on the Multi-Channel Integration Platform. A lack of stock may occur from having already sold that item.
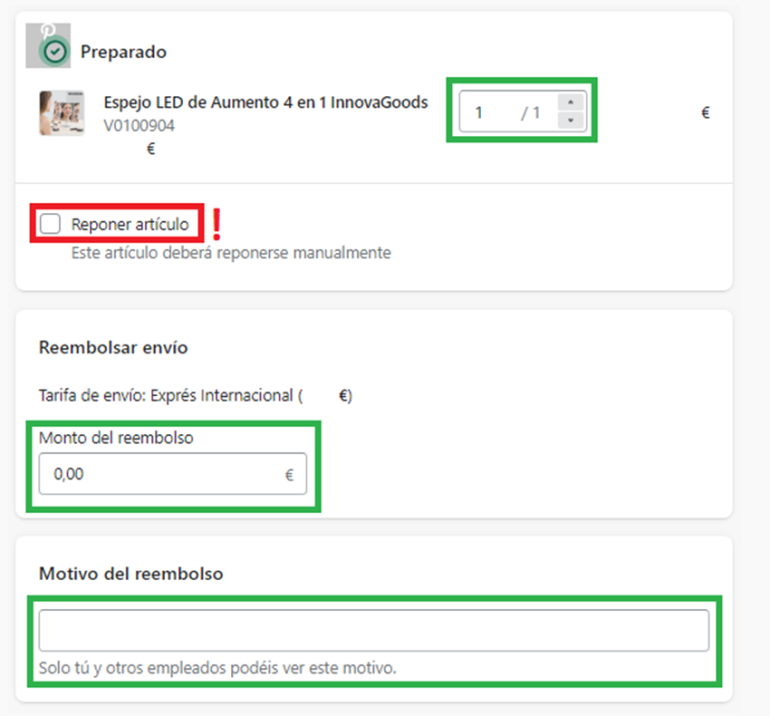
Enter the value of the shipment that you want to refund to the customer
If you wish, note the reason for the refund

You can now carry out the refund. Mark the corresponding box if you want to send a notification to the customer.
Customize your store
With this last lesson you will be able to design and customize your store so it’s personalized as you wish.